Thursday, January 30, 2014

EXCITING NEWS . . .

FINALLY ... I get to share my exciting news with you!
I'm thrilled & honored to let you know that myself and Squigglefly team mates Nancy Williams, Charlene Mitchell and Elizabeth Hart have had baby cards published in the
(on sale TODAY)

(Issue #120)


showcasing the use of a variety of Squigglefly digital images.
Charlene's card made the front cover!  Way to go girl!!
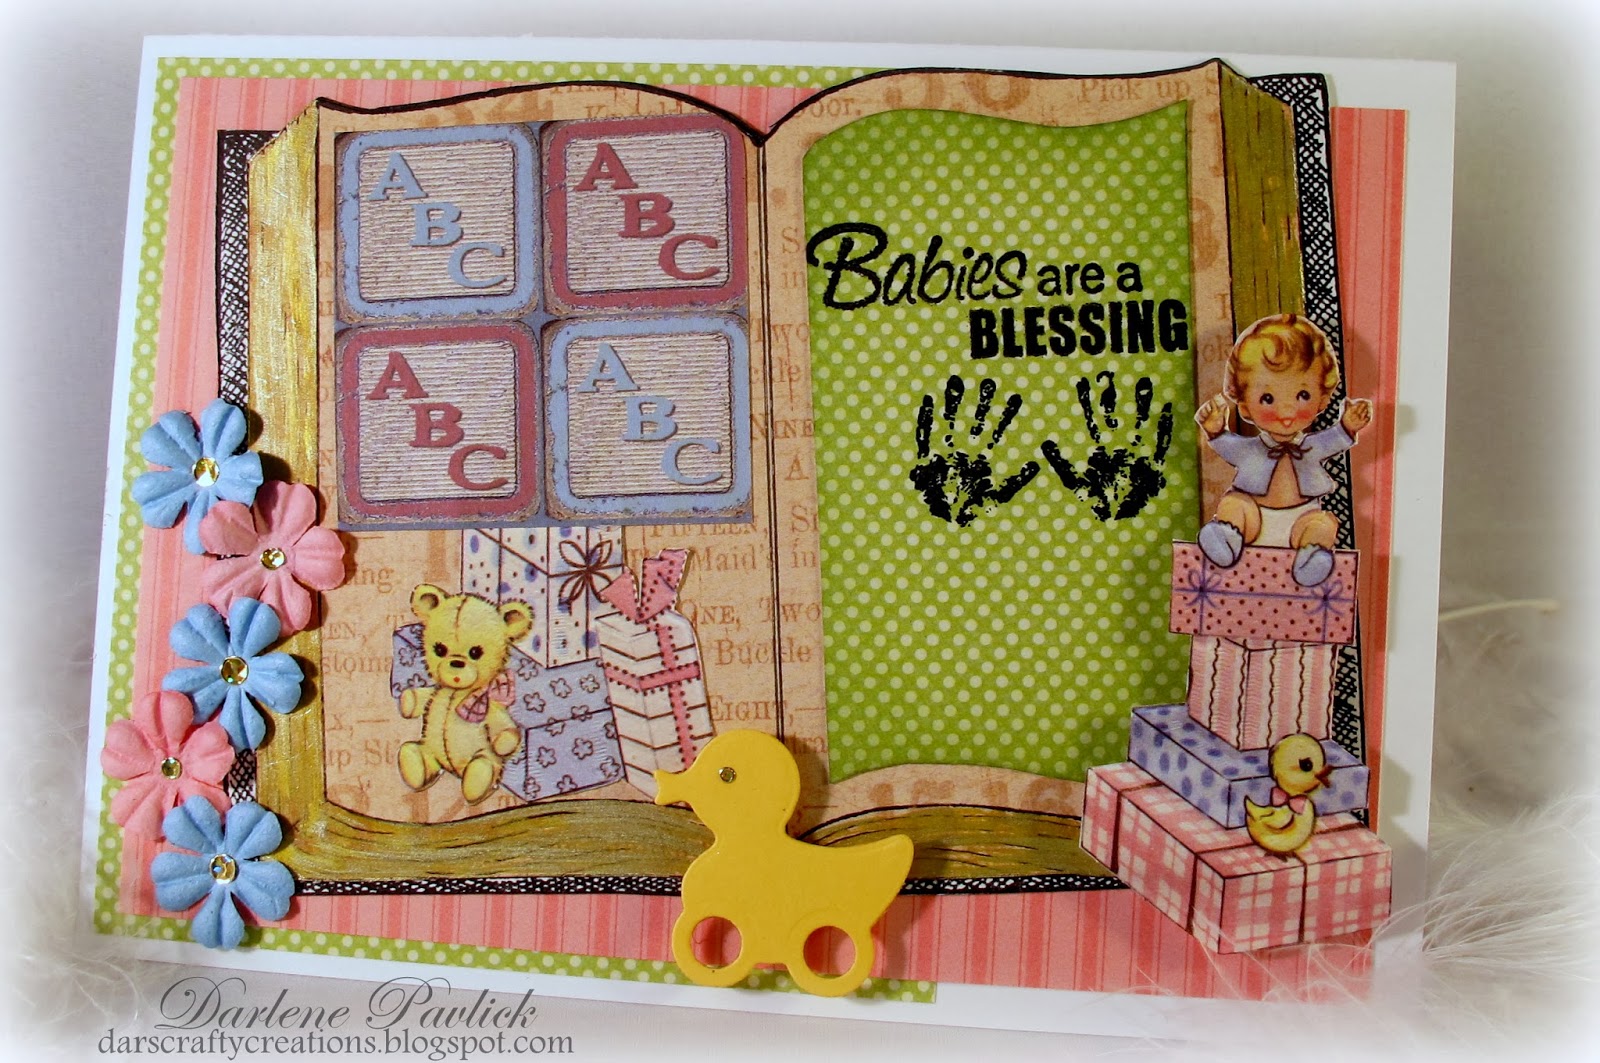
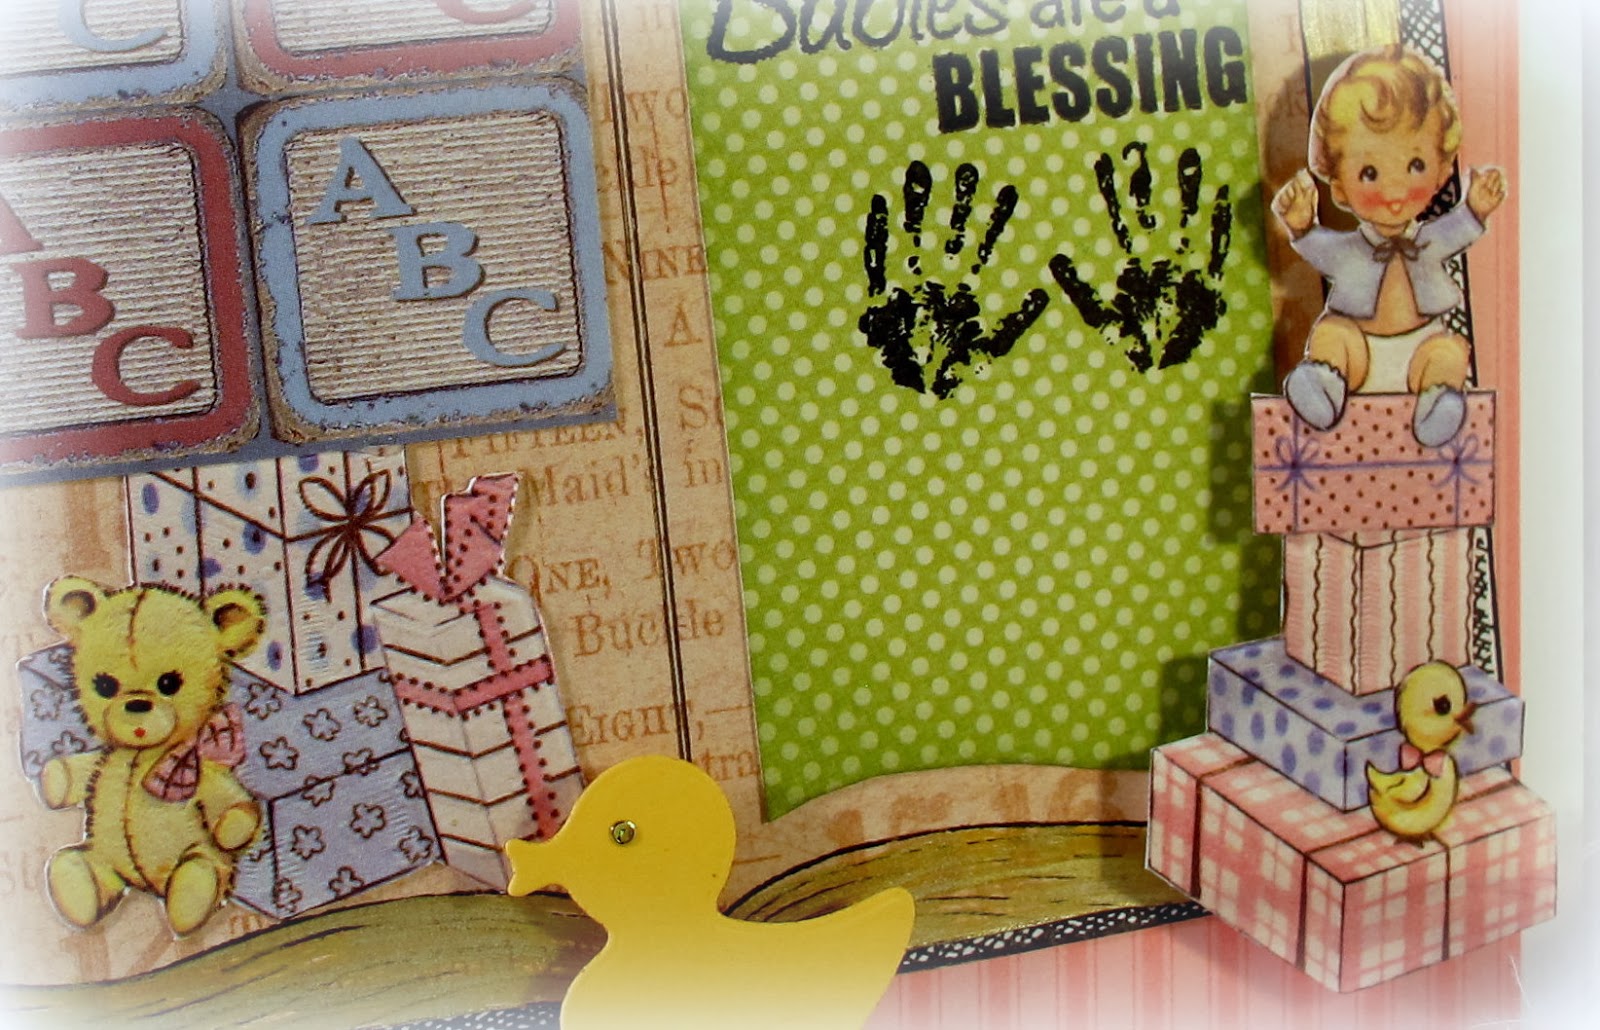
Here is the card I had published...


The digi image was designed by Judith Hart and the sentiment is by Elizabeth Kushner.
Unfortunately, there was a mistake in printing and they inserted my photo on both my card and Nancy Williams (I feel so bad about that!).

While I have your attention {she said with a little snicker} I'd like to share with you another card I have created for the SHAPED challenge going on over at Classy Cards n Such.  SHAPED cards is not really something I do a lot of so this challenge really intrigued me!  And, I must say I like how this came together.


Believe it or not, the base card is the ONLY thing I had to make.
 All the other pieces were laying on my work table, cut for
other projects that ended up not being used!
UNTIL TODAY that is!

Challenges:
Crafting From The Heart - Anything Goes/Fancy Folds
The Paper Nest Dolls - Anything Goes

Thanks so much for stopping by today to share in my publication excitement!
 Trying to stay warm in Ohio ...
we're up to a whopping 8 degrees this morning!
As always . . .

Recipe for SHAPE card:
Paper:  Pink cs, White cs, Blue cs, 
Accessories:  Spellbinder 'Gold Labels Four' die, Heartfelt Creations 'Sun Kissed Fleur' stamps & die set, McGill flower making kit, Cheery Lynn Designs 'Polynesian Sails Oval - center die', Cheery Lynn Designs 'Fanciful Flourish Small',  Cheery Lynn Designs 'Exotic Butterflies'

Tuesday, January 28, 2014

Pretty in Pink . . .

Good Afternoon Blogging Friends!
While dinner (pork chops) is cooking, 
I thought I'd share a card with you that I created earlier today.


I just received some beautiful Crafty Secrets goodies that I was in need of for baby cards.  Not only is our neighbor expecting her first child (a girl) but I have 
completely run out of baby cards in my box to sell at the craft shows.
Plus, I hear that after this frigid Winter , we can expect
another Baby Boom this Fall!  LOL!!

My card is constructed primarily with products from two of my favorite companies ... Crafty Secrets and Cheery Lynn Designs.
The background panel is digital design paper from Crafty Secrets
The images & stamps come from the Crafty Secrets 'Baby Girl 54 piece images and mini clear art stamp set'.

Here's a peek at the inside of my card.
The sentiment is from the Crafty Secrets 'Words from the Heart' (Little Ones).
The panel actually had the bear on the left side of the phrase,
but it was too wide for my card panel so after
coloring the bears using my Spectrum Noir alcohol markers,
I did a little fussy cutting and added it to the top corner.  
Cute, huh!

Here are a couple closeups of the details.  You can click on these images to enlarge if you'd like an even closer look.

This beautiful heart die is from Cheery Lynn Designs and is called "Two of Hearts" #DL128.  I cut out the larger (bottom) heart a second time in the pink cardstock ... then cut the center out so it peeks through the smaller heart on the top which is popped up with pop dots.  The narrow satin ribbon is by Darice and I simply put it through two of the openings and tied it in a bow.  The flower is from Wild Orchid Crafts.

On the left side of the card front I die cut a lace panel with my Cheery Lynn Designs 'Anastasia border die' #B136 of white card stock and then placed a band of the same Darice pink satin ribbon and tied in a bow.  The cute little image in the star was fussy cut, then matted (more fussy cutting) and faux stitched with a white Gelly Roll pen.

Challenge Entries:
Cheery Lynn Designs - Tickled Pink
Party Time Tuesday - Craft Till Your Hearts Content
Sweet Stamps - Lace & Hearts

Thanks so much for stopping by today!
I hope you enjoy my crafty creations as much as I enjoy making them!
Those of you in these frigid temperatures ...
please stay warm & safe.

In *SHAPE*

MORNING!
Are you in Shape?  
I'm not! 
And at this age probably won't be in shape anytime soon!! 
LOL!

The challenge this week at Classy Cards n Such is to make a SHAPED card.
This truly is a challenge for me because I never think to do a shaped card creation ...
but I'm going to work on that!!


 I decided to create a vintage style card 
using my Spellbinder 'Fleur De Lis Squares' die. 
I've even made a coordinating envelope using the WeR Memory Keepers
Envelope Punch Board.


Other design elements are:
Webster's Pages - fabricfancies (really fabric ... beautiful)
Spellbinder Classic Circle die
Goldenrod satin ribbon
White Gelly Roll Pen - faux stitching

I love how this came together!  Thank You Classy Cards n Such for making me think outside the box.  In fact, this was such fun I think I'll try another one! 

Challenges I'd like to enter into:
Amusing Challenge - Anything Goes
Dream Valley Challenge - No Designer Paper

 Thanks so much for stopping.
Hope your week is off to a fabulous start!
Still VERY COLD here in Ohio and supposed to be EVEN COLDER
the next couple of days!  Yikes!
Time to 'Throw Another Log on the Fire!!!!'

Monday, January 27, 2014

So Peaceful . . .

Doesn't this look peaceful?

Good afternoon bloggers!
I snagged this photo of the Chapel at Yellowstone from Pinterest and thought it would make a beautiful card.  I've added the Memory Box #98238 Snowflake corner and a 'portion' of the Memory Box #98171 Frosty Border.
A few Stampendous diamond dots on the snowflakes 
helped to add a touch of sparkle to the scene.

Challenges:
Outlawz Twisted Thursday Challenge - Anything Goes, Twist is add a snowflake

My post is short and sweet today (I know ... so unlike me! LOL)
Please stop back tomorrow when I'll share a creation I'm working on
for the "SHAPE" challenge over on Classy Cards n Such!

Hope to see you then ... stay warm & safe!
As always . . .

Squigglefly Challenge - SFC0414

Hello my friends!
It's time for another challenge over on the Squigglefly Blog but before I share my card with you I just want to give a shout out to MY MOM!
It's her 84th birthday today and I can only pray I'm doing as well when I reach that age! She still 'works a job' (a couple actually) ... sings ... dances .... holds an elected office in her township, etc., etc., etc.
Happy Birthday Mom!!!

(l-r) My sister Linda, Mom & Me ... being silly!

* * * * * * * *
Today's challenge at Squigglefly is:

HAVE A HEART!

I chose to create a front step card using my Cheery Lynn Designs die along with these fabulous images.    Both images ... 'Ruffled Frame' and 'Cup with Hearts' are by Pamela Lehto.  I simply brought my frame image into a blank word document then inserted the cup with hearts die in the center.  Next came some coloring with Spectrum Noir alcohol markers and a little fussy cutting.


I also printed/colored/cut another image of the hearts that are in the cup as an embellishment for the front corner of my card and another full cup colored image for the inside corner of my card.

A few additional challenges:
My Sheri Crafts - Use a digi
Just Us Girls - Photo Inspiration (hearts)
 
Simply Create Too - Valentine's Day or use hearts
 Crafts and Me January Challenge - Hearts

I hope to make more FANCY FOLD cards such as this step card for this years crafting shows ... this is a start!  LOL!

I hope you'll come join in our challenge fun and if you need inspiration please pop over to see what my team mates have created for you today ... WOW!

Enjoy your week ...
As always ...

Sunday, January 26, 2014

Freshly Fallen Snow

Happy Sunday Afternoon Friends!
WOW this weekend has been cold, windy & very snowy!
Welcome to N.E. Ohio, U.S.A.

My goodness but Mother Nature is being cranky!
This is the view I had out my front door yesterday afternoon when I was considering heading outdoors to start clearing the driveway!  
Needless to say, I reconsidered and waited until it stopped.  
All well and good, but that meant I was out in the DARK 
snowblowing the driveway/sidewalks!  LOL

At the same time, here's a view out the back door.
Nope ... not any better out this way!   
Even the squirrels have all run for cover!

I saw the new challenge over at Our Beautiful World is FRESH ...
Trust me, it doesn't get much fresher than
a new blanket of snow!

I know I'm not the only one dealing with these temperatures and snow accumulations.  There have been record breaking temperatures,
snow fall and winds all over
the United States this year!

But for those of you who are dealing ... such as I,
hang in there ... Spring is on the way
(sooner or later)
Stay warm, Stay safe and do what I do ...
hide inside and play!
As always . . .

Encouraging Words . . .

 Happy Sunday Morning Friends!
My dear sweet granddaughter has been going through a bit of a rough patch lately so I thought I'd create something that she can hang on her wall as a reminder of who she is and how much she is loved.

Here's the final product and I will share a short photo tutorial with you on how I altered this wooden frame/bird as well as make the multi-layer butterflies.  So please read on . . 


My wooden frame and bird came from Michael's in the $1 bin.
The design paper on the bird and right side of inner image are from the Paper Studio 'Kirby Teesdale Studio' paper pack.
My frame covering, flower and 3 layer butterflies are from one 8 1/2 x 11 sheet of design paper that I printed from the Digital Valentine Kit available at the Crafty Vintage Girl store of Crafty Secrets.
Digital  - Vintage Valentine Kit - D-117

STEP 1:
Very easy ... simply trace and cut


STEP 2:
 I chose this adorable image from the Crafty Secrets digital
Printed onto white card stock and colored with Spectrum Noir alcohol markers.
(Mistake alert:  while coloring I accidentally colored her sleeve yellow instead of pink ... didn't realize it till I had it put together so modified her blouse sleeves to be orange/red ... that's what happens when you put pink over yellow ... LOL)
I adhered my image to the insert chipboard that came with the frame and since I've had this cute image sitting on my desk waiting to be used, it wasn't the right size so I added a piece of the same paper as the bird and pink grosgrain ribbon to adjoin them.
I also did a little fussy cutting of the LOVE YOU section of paper to adhere to the base of the frame.  I didn't want to loose the pretty scallop on the top section of the paper.

The back and sides of the frame were painted with Tim Holtz white Distress Crackle Paint for a more vintage look.  Once dry, I flipped it over and adhered my CS design paper to the front using Mod Podge and a sponge brush.

NOW COMES THE FUN PART
Creating the pretty butterflies!

 Still working from my original printed sheet of Crafty Secrets Valentine Kit design paper, I punched out six butterflies (3 for each butterfly).  I used my new EK Success punch but you can use what ever butterfly die cuts or punches you may have on hand.


Using my flower making foam pad and a stylus, I went around the edge of each wing to help 'condition' it (like you would when you're making a flower) and with light pressure drug my stylus down the center to make the wings pop up.
 Once they were conditioned, I used a small line of Art Glitter white glue to adhere/stack them together.  For sparkle I used Stickles 'Thistle' along the edges of the one and 'Diamond' along the other (see close up below).
 

Here are a couple closeups of some of the detail.
'Diamond' Stickles was also used on the wings, as well as a few 'fairy dust' dabs in the white space of the image.

 My flower was actually cut from the same paper but I got a little 'heavy handed' with the Dylusions 'postbox red' ink spray (new product for me) so I tried to alter the layout of the petal panels so some of the background paper showed through.


I hope you've enjoyed my little tutorial 
(sorry it was PHOTO HEAVY but I don't have the means for a video tutorial). 
All products used will be listed below, after my name.

Challenges I'd like to enter:
Mod Squad Challenge - What 'Wood' You Create
Digitally Sweet - Anything Goes (digital image & papers)
Fun With Shapes - Gift Package
Fussy and Fancy - Vintage
The ABC Challenge - D is for Dazzle
Emerald Faeries - Things with Wings
Altered Eclectics - Anything Goes
Die Cut Divas - Make it Glitter

Thanks so much for stopping by and for your encouragement!
Hope you are having a wonderful weekend!
Enjoy this LAST WEEK of January 2014~ times flyin'!
As always . . .

Recipe:
Papers:  Crafty Secrets Digital Vintage Kit, the Paper Studio
Accessories:  Michaels's wooden $1 frame, Michael's wooden $1 bird, Cheery Lynn Designs Fanciful Flourish Sm B117S die, EK Success butterfly punch, Cheery Lynn Designs Shasta Daisy flower die, Pink grosgrain ribbon, Stickles 'diamond' and 'thistle', stylus, foam forming mat, dylusions ink spray, Tim Holtz distress crackle paint, foam brush, Fiskars swivel craft knife, pop dots, white glue

Friday, January 24, 2014

"Grow Your Blog"


Hello to all my friends out in blogland and a 
special Hello to any NEW FRIENDS who are joining today!
I have joined with over 600 other wonderful bloggers to
have a "Grow Your Own Blog Party!!!
Let the party begin.....All the links can be found HERE at
2 Bags Full! 
thank you Vicki  for hosting this wonderful event!!

My name is Darlene Pavlick 
(also known as "akronstamperdpk" over on Splitcoast Stampers).

I am retired, which happily gives me plenty of time for crafting in my 'crafting cave'.  But before retiring, I did office/computer work in a variety of categories over the years ... Retail, Steel Industry, Nuclear Site, and my final out of home job was Administrative Assistant to three Senior Partners in a law firm.

My life's partner is Mark who is the most amazing person, we have one daughter who is happily married to Frank and they have 2 wonderful children ... granddaughter Morgan (21) and grandson Jonathan (16). 

You will see that most of the postings on my blog are in reference to my love of paper crafting.  But you will also see a few more personal posts ... i.e.  what my grandkids/daughter are up to or even some home canning/recipes.

My daughter will tell you that about 10 years ago when we moved to Akron, OH (from Toledo, Ohio but originally from the Pittsburgh, PA area) she introduced me to scrapbooking. At the time, she was selling Creative Memories so even though I was a little reluctant, I agreed to partake in her adventure and support her by joining in on her 'crops'.  Well ... long story short, one of the gals was a Stampin' Up rep and a friend of my daughter's so in support of HER efforts I started buying stamps ... that's all it took!  I was hooked!

Here's a photo of my crafting 'CAVE'.  This is where you will find my 90% of the time! Paper crafting is so rewarding (but so addicting LOL).  More photos HERE and a cave revamp HERE.  Told you it was addicting! LOL!

Daughter suggested I start a blog and share my beautiful creations (her words) ... my comment was "I don't know anything about blogging!  I wouldn't even know where to begin."  Well, being the nosey curious person I am, I started snooping around the worldwide web and POOF ... all of a sudden I was the proud owner of Dar's Crafty Creations Blog! 

I'm sure you will agree ... what a fabulous invention this 'internet thing' is!!  I have met so many amazingly wonderful people through my blog ... from all over the world ... and proud to say many of them are now close friends!  I have met several of these ladies in person ... Oh what a treat that has been!!

I'm looking forward to visiting YOUR blog and hopefully making a new friend!
If you like what you see here at my blog ... please feel free to become a follower or better yet, a subscriber so you don't miss any postings.  I would be thrilled to have your visits and your comments!!

Thanks for stopping by!

A Special Card for a Special Lady ...

Happy Friday Friends!
A few weeks ago I shared with you birthday cards I was making for my mom and a couple of my friends who share the same birth date with my mom.  Well, those are in the mail and on their way (they'll probably get them tomorrow) ... but I thought I'd surprise Mom and send her an extra special card since she's an extra special lady!

Isn't this flower gorgeous!
My friend Judy (Back Porch Crafts by Judy) showed a group of us friends, who linked up out in Indiana at Joan's Gardens last year, how to create it.  It's vellum that has been stamped, embossed and die cut.  Then 'conditioned' and pinched.  She showed us a technique on the leaves too (need to call her ... can't remember exactly what we did on those ... should have written down some notes!)


Behind the flower I used  a new doily die I purchased while craft shopping last week.  It is by Quic Kutz and is called 'Antique Doily' #DR0248
 I have used some GORGEOUS new metallic papers I purchased at Classy Cards n Such.  In fact, I bought 5 packs of different colors and will be ordering a larger variety of colors ... this paper is beautiful and works PERFECTLY with dies!!  I used the purple for the doily, the green for the butterflies and both green & champagne for the flourishes.
LOVE IT!!


This card is a 5x7 card so I had lots of room to play with!
All products used will be listed at the end of this post under my name.

Dummy me ... I should have taken photos of the inside and again when I had it wrapped and in the clear box for mailing ... but NO ... absent minded me forgot until I had the box sealed!  TOO LATE!

Yes, I sent it to her in a clear box
(cost $2.01 for postage ... current rates that is ... will be more starting Monday).
I finished the inside of the card by die cutting a heart ... like the one used here

and placing it on the left side of the inside.
On the right side I used a scrap piece of Graphic45 (same pack) with little purple lilacs.  Then, die cut a white Spellbinder classic heart and stamped my 'a special card for a special person' sentiment and placed it over the lilac panel.
Lastly, I wrapped it in lilac tissue paper, did a gift wrap purple swiss dot ribbon/bow and placed it in the clear box.  Secured the ends with clear packing tape, added her address and my return address ... Viola!
She SHOULD receive it on Monday ... her 84th birthday!

A few challenges:
Fussy and Fancy Friday Challenge #106 - Vintage
Sister Act Challenge #41 - Anything Goes
Stampin' for the Weekend - Happy Birthday
Sweet Pea Stamps - Flower Power
The ABC Challenge - D is for Dazzle
Emerald Faeries - Things with Wings
Just B Creative January Linky Party - Just Because - Anything Goes
Seemacrafts January Challenge - Anything Goes

Thanks so much for stopping by and taking a peek!
I wish I could be a 'fly on the wall' when she receives this card ...


Recipe:
Papers:  White cs, Graphic45 'Secret Garden' dp, Vellum, Metallic papers XP-73017600 Stardream Emerald, TPC-616 Champagne Neenah Pearlized Metallic, TPC-740 So...Silk Fabulous Purple
Stamp/Ink:  Inkadinkado, Versafine Onyx
Accessories:  Cheery Lynn Designs 'Fanciful Flourish Sm' #B117S, Quic Kutz 'Antique Doily' #DR0248, Cheery Lynn Designs 'Exotic Butterfly Small #DL112, Martha Stewart 'Trellis Border' punch, Zva Creatives pearl flourishes, Kaiser Craft pearls

Thursday, January 23, 2014

Babies are a Blessing . . .

MORNING!!
Yesterday I worked on a creation with a couple of challenges in mind and love how it came together!  We have a neighbor couple expecting their first child so I'll be saving this card for the baby shower in March.

 My THEME BASIS comes from the Monday Greeting Card Challenge at The Outlawz site.

"NEW ARRIVAL - BABY"

AND, my DESIGN THEME comes from the Papercrafter's Corner - Monday Magazine #37 Challenge using this image for inspiration.

Papercrafting Inspiration: Magazine Mondays - Week Thirty-Seven Inspiration Piece (image)

I was inspired by the BOOK format and since I have a Heartfelt Creations Bible stamp that I've never used (probably 2 years old) ... it was time to blow the dust off of it and get it inky!!!
I stamped the image twice ... once on white paper and again on Graphic45 'An ABC Primer' design paper - One Two, Buckle My Shoe.  I cut the 'inside pages' from the design paper and layered it over the top of the black/white stamped image.

My childhood/baby images came from an older Crafty Secrets booklet called 'Joys of Life'.  Unfortunately, this booklet is out of print but they have a variety of other wonderful Baby/Children images, etc. that you could use in the same manner.  You can visit the Crafty Secrets Crafty Vintage Girl store to find what would work best for your project.

TWO for ONE!
The images of the baby on top of the gifts & the gifts under the ABC blocks was actually ONE image.  I simply fussy cut to separate it into two images
because it was too tall for my card.
By doing that, the lower portion of the boxes was not square at the top (white with blue dots box) because it was under the pink plaid box.
I simply put a dab of glue on either corner and tucked it up under the ABC blocks image.  Problem solved!  LOL!

I've also popped up the yellow ducky and the baby on presents image for a little added dimension.  Once I had it adhered into place I realized I should have added some ribbon, or fibers or 'something' to the left side for balance.
Hence the curvy row of  pink & blue flowers, LOL!

A few added challenges:
Creative Craft Challenge - New
(Bible Stamp & Spellbinder die set ... OLD but NEW to my use.)
Flourishes #255 - In with the New
Digi Darla's #98 - Alphabet Challenge
Addicted to Stamps - Flowers
Diva's By Design - Anything Goes
Fab 'n' Funky - All About the Words
Paper Pretties - Anything Goes
Word Art Wednesday - Anything Goes

I hope you've enjoyed my little creation and if you have any questions, please feel free to ask.  I will answer as best I can and as quickly as I can.  You can always email me also ... my contact email is in the sidebar.


Stay Safe, Stay Happy and as always . . .

Recipe:
Papers:  White cs, Graphic45 dp, DCWV Nana's Nursery dp,
Stamps/Ink:  StampCraft 'Newborn Hands' #440D29, Fiskars Precious Baby Quotes, Versafine Onyx
Accessories:  Fiskars swivel craft knife. Darice flowers, Stampendous diamond dots, Spellbinder 'Play Time' #S4-261(never used before and over a year old), pop dots, Pentel Gold Metallic Brush